P2tog TBL
(Purl 2 together through back loop)
A “P2tog tbl” is similar in concept to the P2tog, but it has an interesting twist to it.
A “purl 2 together through back loops” is, in my opinion, the most difficult of the decreases described.
A slightly easier version of this decrease is the SSP (Slip Slip Purl).
Your target, as usual, is the next two stitches on the left-hand needle (for most knitters).
But first, fold the left-hand needle so it is behind the right-hand needle as you look at it.
Now, insert the right-hand needle into the two target stitches, from right to left (because this is a purl-type stitch). The needle will be going into the back loops of those stitches, because the back of the fabric is now facing you, because you folded the left-hand needle behind the right-hand needle.
Complete the purl stitch as usual, and at the end drop the two stitches from the left-hand needle, and position the left-hand needle in the normal manner (unfold it).
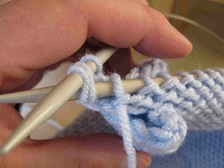
The photo shows the right-hand needle inserted into the back loops of the two stitches on the left-hand needle. The yarn is ready to be wrapped over the right-hand needle to complete the purl stitch – make sure that you don’t wrap the yarn around the left-hand needle too!
A “purl 2 together through back loops” is, in my opinion, the most difficult of the decreases described.
A slightly easier version of this decrease is the SSP (Slip Slip Purl).
Your target, as usual, is the next two stitches on the left-hand needle (for most knitters).
But first, fold the left-hand needle so it is behind the right-hand needle as you look at it.
Now, insert the right-hand needle into the two target stitches, from right to left (because this is a purl-type stitch). The needle will be going into the back loops of those stitches, because the back of the fabric is now facing you, because you folded the left-hand needle behind the right-hand needle.
Complete the purl stitch as usual, and at the end drop the two stitches from the left-hand needle, and position the left-hand needle in the normal manner (unfold it).
The photo shows the right-hand needle inserted into the back loops of the two stitches on the left-hand needle. The yarn is ready to be wrapped over the right-hand needle to complete the purl stitch – make sure that you don’t wrap the yarn around the left-hand needle too!
